

Pull Up On The Right & Reverse In A Straight Line
- Simon Harrison

- Apr 5, 2020
- 6 min read
Updated: May 9
What is involved in the pulling up on the right manoeuvre?

The pulling up on the right and reversing in a straight line manoeuvre was included in the driving test in 2017.
The manoeuvre is pretty straightforward. There are three main parts to this manoeuvre:
● pulling up on the right-hand side of the road,
●reversing for 2 or 3 car lengths in a straight line and then,
●pulling away safely to rejoin traffic on the correct side of the road.
Whilst the Highway Code advises drivers not to park against the flow of traffic, the DVSA notes that there are many real-life situations in which drivers may have to do so. As such, it’s important that learners to understand how to perform the manoeuvre safely and correctly.
If you are asked to pull up on the right, it will sound something like this:
“Ahead I want you to find somewhere safe to pull up on the right-hand side of the road giving yourself enough room to reverse back about 2 to 3 car lengths back in a straightline keeping reasonably close to the kerb.”
What is the examiner looking for?
The examiner will be assessing how safely you move across the path of oncoming traffic and park within a reasonable distance of the kerb. They’ll be monitoring whether you apply the parking brake after stopping and put the car into neutral. The examiner will also be watching you and assessing your all round observation of your surroundings before and while you complete your reversing exercise.
Throughout the manoeuvre, the examiner will be looking for:
Careful and clear observations: you need to use your MSPSL routines and show full awareness of other road users when pulling up on the right, reversing and rejoining traffic.
Accuracy: you need to correctly position the vehicle throughout the manoeuvre and show confidence with doing so without instruction.
Control: some of the manoeuvre will require you to move carefully and slowly, so you’ll need to be on the ball and show careful planning and judgement.
You might accumulate driving test faults during this manoeuvre for incorrect use of controls and/or accuracy or not showing due regard for oncoming traffic.
Please note:
If another vehicle pulls up behind your vehicle, preventing you from reversing back, then you won’t be able to complete the manoeuvre. In this situation, the examiner will ask you to keep on driving and get you to carry out another manoeuvre later in the practical. I would always advise students to take some responsibility in this situation and make the examiner aware of any situation that may prevent you from completing the task. It shows your compitent attitude and awareness of situations that you face.
If a vehicle pulls up in front of your vehicle, then you’ll still be able to carry out the manoeuvre. If it blocks your view, the examiner may take control of the situation and offer appropriate advice.
Step-by-step: How do I pull up on the right?
1. Find a suitable and safe location to pull up
The examiner will only tell you to pull up on the right when it’s safe to do so. As such, it will be entirely down to you to pick a spot at which to pull up. Don’t panic and simply choose the first empty spot you can find—instead, apply the same principles as you would when pulling up on the left. We’d recommend that you look for a large space that will give you plenty of room to get your vehicle straight next to the kerb.

If it’s a tight road, you don’t want to pull up across from parked vehicles—it will make it much more difficult for you to rejoin traffic.
Try to avoid blocking driveways where you might get in the way of drivers entering or leaving. If you have to, however, you are allowed to do so for this manoeuvre.
You’ll want to avoid pulling up too closely to junctions, bends or bus stops, as you might end up causing an obstruction or an accident if visibility is limited.
If you can, try not to pull up behind another vehicle—it will block your view of oncoming traffic when you need to rejoin the road.
2. MSPSL
Once you’ve got a spot picked out, it’s important that you use the MSPSL (Mirrors, Signal, Position, Speed, Look) routine to safely move towards the right.
Look at your interior mirror, check your right-hand mirror and follow up with a check of the blindspot over you right shoulder. If it’s all clear, signal to the right.
Position your vehicle to the right-hand side of your lane, as if you were making a right turn at a junction.
It’s important not to rush here—wait and see if you need to give way to oncoming traffic. If you have to wait, check your mirrors again. You never know what might have changed!
Once it’s clear, give your mirrors another quick check and be sure to check your right shoulder blindspot again.
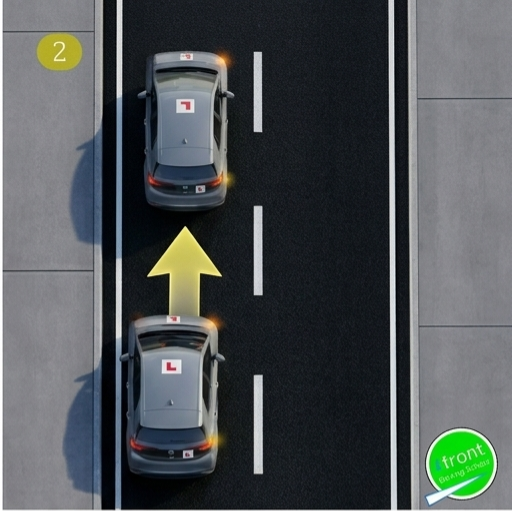
3. Pull up on the right
As a rule of thumb, it’s advised that you leave around 8 car lengths from where you’ve stopped to give way to oncoming traffic to where you intend to pull up. This will give you plenty of room to manoeuvre and straighten up your vehicle.

When it’s safe to pull up on the right, try to move in at a shallow angle. If you try it at a steep angle, you’re more likely to hit the kerb, and you’ll also have more trouble getting your vehicle parallel to the kerb.
You need to get relatively close to the kerb—around 30 -40cm away, half a car door width or drain cover width away from the curb.
Try to get the vehicle parallel to the kerb and straighten the wheels before you stop. By doing so, you’ll make things easier for yourself when you have to reverse.
Stop the car, put the Parking brake on and put the car into neutral.
4. Reverse and move off
Once you’ve stopped the car, the examiner will then asked you to reverse back for approximately 2 to 3 car lengths. If you’ve done as we advised and stopped parallel with the kerb, this should be quite easy to perform.
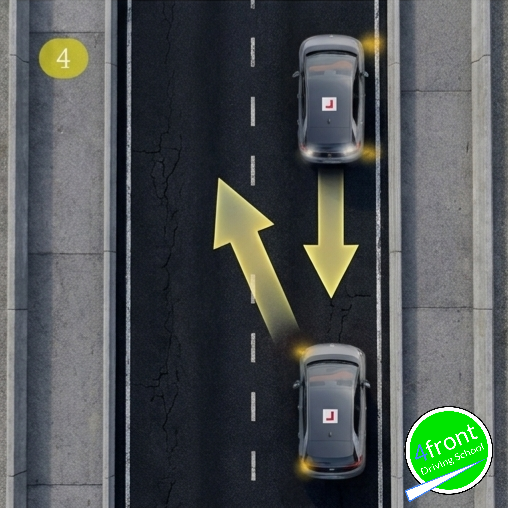
Start by selecting the reverse gear. Before you start moving, you need to make sure there’s no oncoming traffic. If there is, wait for the vehicles to pass.
Now it’s time for mirror and blind spot checks. Work in an anti-clockwise movement—check your right shoulder blind spot, right-hand mirror, interior, left-hand mirror, left shoulder blind spot and then the rear window. Don’t lean on the steering wheel when completing your observation. The car wants to travel in a straight line so be loose with your steering.
Keep an eye on the rear window as you reverse, continuously looking in all directions for other road users. If you have to stop for pedestrians or cyclists, for example, you’ll have to do your checks all over again.
Keep your reference point in mind and line up with the kerb as you reverse. Once you’ve moved 2 or 3 car lengths, stop the car, apply the Parking Brake and select neutral. The examiner will tell you when to move off.
Once you’re ready to do so, select first gear, remove the parking brake so that the car is ready to go and do your checks. Look at your interior mirror, check the left-hand mirror and look at your left shoulder blindspot. Check for oncoming traffic and if it’s all clear, signal left and move off.
Manoeuvres in your Driving Test
As part of your driving test you’ll be asked to do one of 4 possible manoeuvres:
A parallel park at the side of the road,
A forward bay park in a bay in a public car park,
A reverse bay park at the test centre car park
A pull up on the right-hand side of the road, reverse for 2 car lengths and rejoin the traffic.
The emergency stop is not classed as a manoeuvre but is an additional task that could take place in one in 3 tests.
Keep it simple and don’t over complicate the exercise.
If you are interested in learning to drive then please call Simon at 4front Driving School on 07905657229
Or visit our website on http://www.4frontdrivingschool.co.uk
You can email 4frontdrivingschool@gmail.com
Or visit our Facebook Page at http://www.facebook.com/4frontdrivingschool


Comments